
· hands on
What is the Windows Subsystem for Android (WSA)?
The Windows Subsystem for Android (WSA) allows you to run Android apps on Windows 11. You can install it by getting the Amazon Appstore from the Microsoft Store. Developers can activate Developer mode to test and debug Android apps.
The Windows Subsystem for Android (WSA) enables you to run native Android apps on Windows 11. It serves as a virtualization layer, much like how the Windows Subsystem for Linux (WSL) allows Linux applications to run natively on Windows. This feature is especially useful for TypeScript developers working on React Native applications, as it offers a convenient way to run and test apps through native integrations.
Contents
- Contents
- TL;DR
- Installing the Windows Subsystem for Android
- Activating the Developer mode
- Connecting the Android Debug Bridge (adb)
- Starting React Native apps using Expo
- Advanced settings
- Video Tutorial
Contents
TL;DR
- Install the "Amazon Appstore" from the "Microsoft Store"
- It will silently install the "Windows Subsystem for Android"
- Go to "Windows Subsystem for Android" → "Advanced Settings" and turn on "Developer mode"
- Go to "Windows Subsystem for Android" → "Experimental features" and turn on "Local network access"
- Click on "Manage developer settings" to start the emulator
- Toggle "Developer mode" on and off to see your
adbconnection URL (IP address & port) - Install
adbin your Windows system through the Android SDK Platform-Tools - Find your local IPv4 address on Windows using
ipconfig - Try to connect
adbfrom your Ubuntu terminal (WSL2) with your Android Emulator (WSA) on Windows, Example:adb connect 192.168.178.70:58526(the IP address you got fromipconfigand the port from the adb connection URL) - Try to run an Expo Go project using TypeScript (it will discover your emulator) using
expo start --tunnel
Installing the Windows Subsystem for Android
WSA is designed to work closely with the Amazon Appstore, which serves as the platform from which users can download Android apps. When you access the Microsoft Store, you have the option to install the Amazon Appstore. Doing so will automatically install the Windows Subsystem for Android in the background.
Once installed, the Amazon Appstore and the Windows Subsystem for Android become available from the Start menu in Windows 11. In terms of window management, Android apps on Windows can be resized freely, and they are expected to be responsive to these changes.
Activating the Developer mode
For developers, the Windows Subsystem for Android offers a new platform to test and debug Android apps. By navigating to Advanced settings you can enable the Developer mode. Once this mode is activated, an address is displayed that allows you to link the Android Debug Bridge (adb) when you start up the Android emulator.
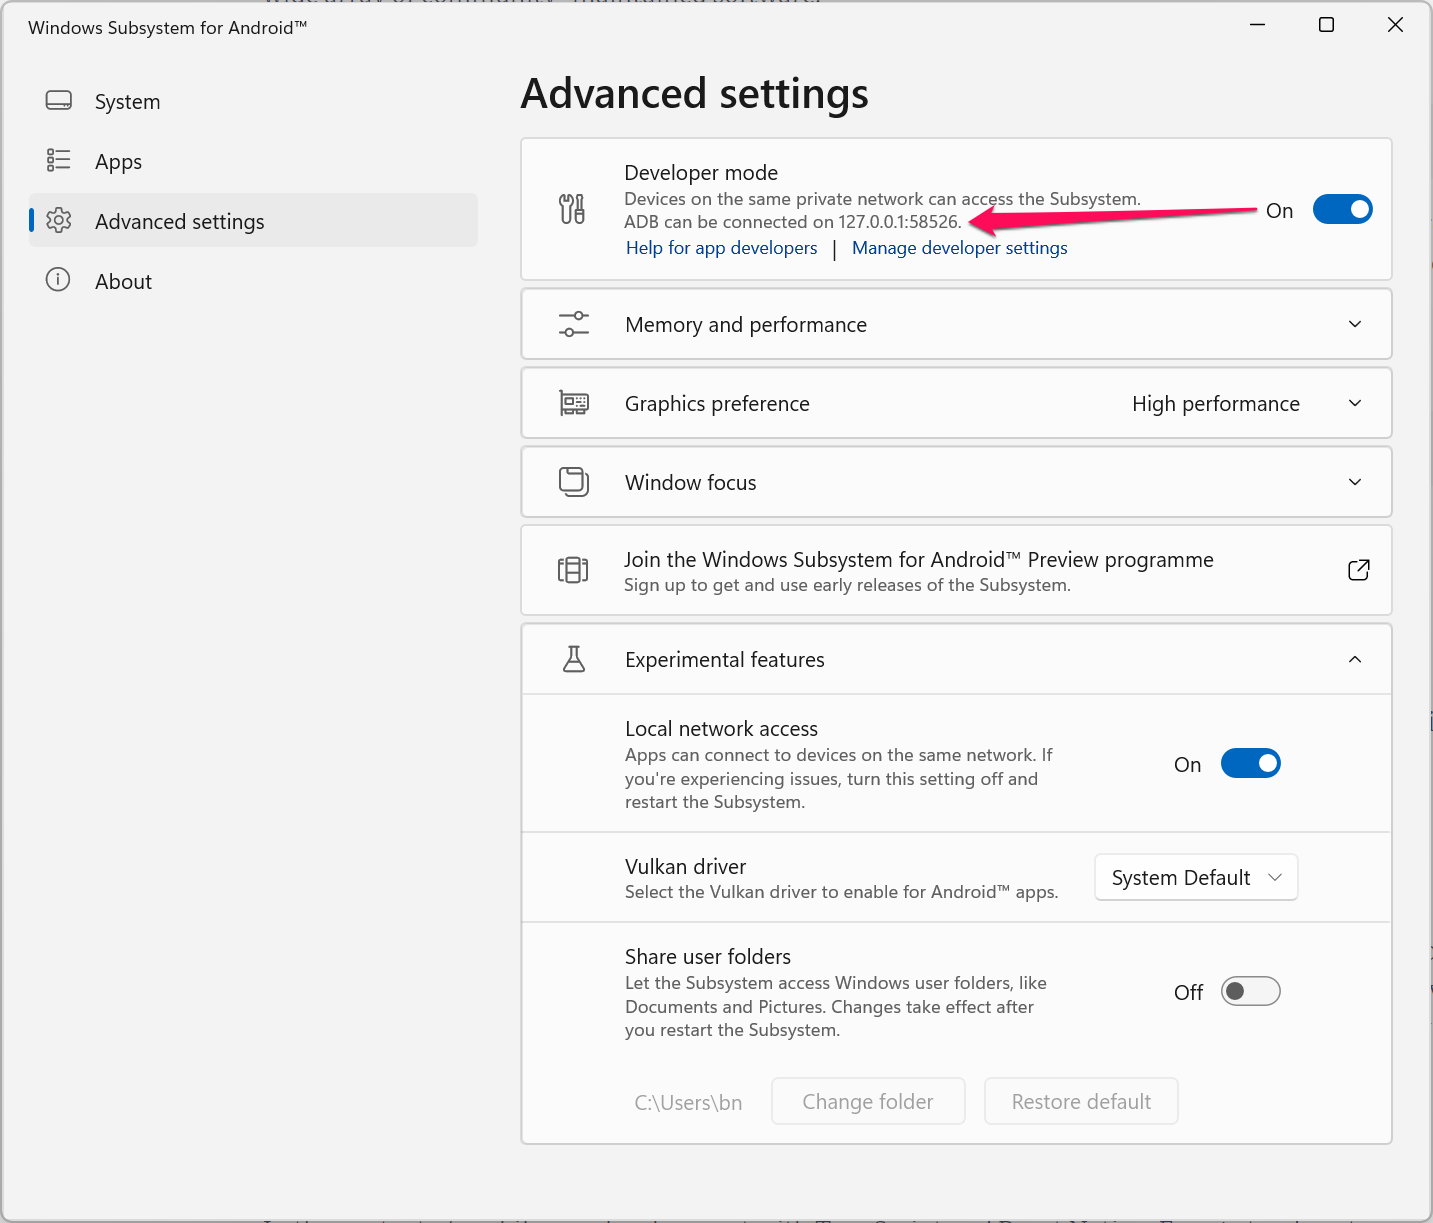
Hint: To make the adb address visible, you may need to switch "Developer mode" off and on again after initiating the Android emulator.
Connecting the Android Debug Bridge (adb)
First, make sure Developer mode is enabled in your WSA settings. After activating Developer mode, start an Android app like the "Amazon Appstore". This step is crucial for booting up the virtual machine that operates WSA. You can also initiate the "Windows Subsystem for Android" via the Start menu.
When the Android system is up and running, indicated by icons in your taskbar or listed under running "Apps" in your Task Manager, you can proceed to connect using adb. If you don't have adb installed on your Windows machine, you will receive this error message in the Windows Command Prompt:
'adb' is not recognized as an internal or external command, operable program or batch file.
Users of the Windows PowerShell will receive a similar error:
The term 'adb' is not recognized as the name of a cmdlet, function, script file, or operable program.
To make adb accessible, install the Android SDK Platform-Tools. You can also install them via the Windows Subsystem for Linux (WSL) using this command:
sudo apt install adbIf an error message appears stating Error: Unable to locate package adb, you'll need to add the universe repository to your Advanced Packaging Tool (apt). This repository is one of the four main repositories within Ubuntu and grants access to a wide array of community-maintained software.
To add the "universe" repository, execute:
sudo add-apt-repository universeIt's a good practice to refresh the package list by running sudo apt-get update after adding a new repository. This is because the package manager needs to refresh its local cache of available packages to include the packages from the newly added repository.
With adb installed, you can connect to your Android emulator using the following command:
adb connect 127.0.0.1:58526You may run into the following error when trying it for the first time:
failed to connect to '127.0.0.1:58526': Connection refused
If you attempt to connect using an address that begins with 172, which is reserved for use within private networks and is not accessible from the public internet, you may experience this issue:
failed to connect to '172.23.16.1:58526': Connection timed out
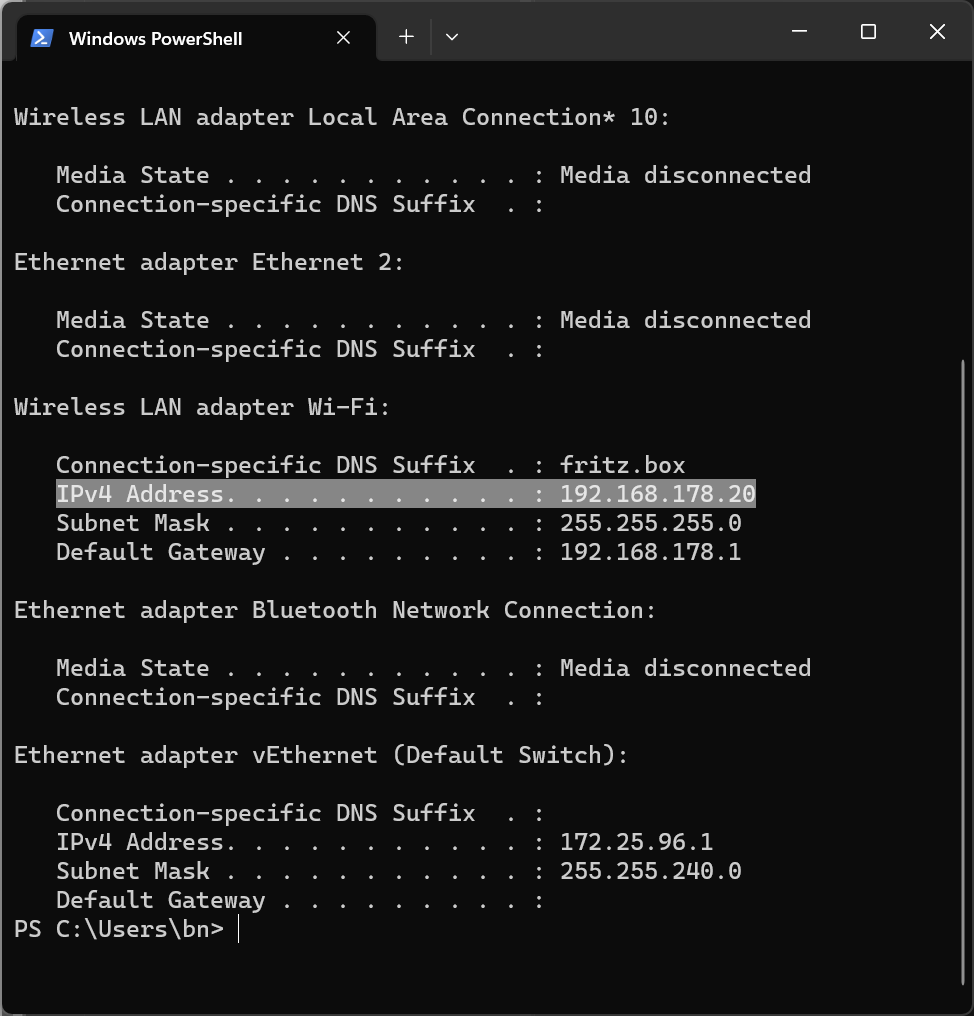
Make sure that your Microsoft Defender Firewall (or similar) doesn't block the network requests. You may also need to use a different IP address than 127.0.0.1. Simply enter ipconfig in the Windows PowerShell to get an overview of your available network addresses. Generally, you'll want to use an IPv4 address from your home network, typically starting with 192.168.
Starting React Native apps using Expo
In the context of mobile app development with TypeScript and React Native, Expo stands out as an efficient way to boost your development workflow. The Expo ecosystem is particularly appealing to Windows developers, as its EAS Build lets you compile your iOS apps in the cloud, eliminating the need for a macOS system. The Expo SDK is well-tested, written in TypeScript, and built for Android, iOS, and the web.
When running expo start in an Expo project, the Expo CLI starts a development server and generates a QR code. If you're using a real iOS or Android device, you can scan this code using the Expo Go app to connect. The development server will then distribute the current version of your local mobile app.
To get Expo to work with the WSA, a bit of configuration is needed, so that your local Android emulator can connect to your local Expo development server. Navigate to the "Windows Subsystem for Android", go to "Advanced Settings" and then to "Experimental features". Here, you'll need to enable "Local network access". Once this is done, restart the WSA and run the expo start command in your Expo project again.

Advanced settings
If you're a developer who intensively works with Android apps, you may want to allocate more system resources to the Windows Subsystem for Android. To do this, follow these steps:
- "Advanced Settings" -> "Memory and performance" -> "Subsystem resources" -> "Continous" to make sure that the subsystem never goes on idle
- "Advanced Settings" -> "Memory and performance" -> "Memory allocation" -> "High (16 GB)" if you have enough spare memory to share
- "Advanced Settings" -> "Graphics preference" -> "High performance" to use a dedicated graphics card if available
For those who don't plan on using WSA frequently, it's advisable to manage its startup settings to prevent it from automatically launching when your computer starts. To do this, open your "System Configuration" and go to the "Startup" section. You might find that WSA is set to start automatically with your operating system, which you can choose to disable.